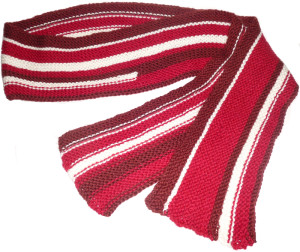
I had been promising a friend of mine a scarf that looked like a strip of bacon (called “streaky bacon” by those in the UK) for awhile, and this year I finally managed to sit down and create one.
I made up my own pattern as I wasn’t fond of any that I found out there. Below is how I created my version. You’re welcome to use it. If you make one of these, I would take it as an evilness if you’d credit me for the design on Ravelry (dinajames) or wherever you post pictures of your work (if you do that sort of thing).
Please do not sell items made from this pattern. It’s free for a reason.
Needles: Size 8 circular, 36-40” cord
Yarn: 3 skeins of worsted weight yarn – 1 dark red/rust/burgundy, 1 red, 1 white/natural/cream (at least 200 yards each for a total of 600 yards)
Gauge: Not critical, but 4-5 st. per inch is preferable. This scarf is knit horizontally.
Note: This scarf is done in garter stitch. In garter stitch, a “row” is actually two passes across the needle instead of the usual one, making a ridge. Remember when changing colors to leave at least 6” of yarn to weave in.
About changing the colors – if you do this as I’ve instructed, all color changes but one (noted below) should be on the same side of the work. This was my design choice/preference. If you don’t mind broken lines of color in your project, don’t worry about which side you change colors on!
Instructions:
Special Note: When I say “knit for 1 inch,” I mean WIDE, not LONG. 1″ in HEIGHT of the work, not 1″ across the work.
Cast on 250 stitches of the dark red using the backwards loop method. (Or, hey, if you want to cast on 250 stitches with a long-tail method, go for it! It doesn’t have to be backwards loop. I’m not a masochist, which is why I went with the one I did. Also, backwards loop is stretchier, so make sure your bind off is also loose if you use that method.)
Knit for 1” (width, not length! Should be about 4 ridges!) with the dark red.
Cut dark red. Change color to natural. Knit 2 rows (1 ridge).
Cut natural. Change color to red. Knit 1” (again, about 4 ridges) of red.
After 1”, knit 80 stitches using the red, then join natural, twisting the yarns in the back to avoid a hole. Knit 170 stitches with natural.
Turn the work and knit back across the natural to the red (170 st), then knit with the red for the remaining 80 stitches (again, twist the yarns in the back to avoid a hole) to the end of the row.
Repeat for 4 rows (2 ridges).
Turn the work, knit 80 st with red to natural, cut natural yarn, twist with red and continue knitting across to the end with the red yarn for an additional 4 rows (2 ridges).
Cut red. Change to dark red.
Knit for 4 rows (2 ridges).
Cut dark red yarn, change to natural.
Knit for 170 st, then join dark red (twist yarns to avoid hole). Knit with dark red for 80 st.
Turn and knit with dark red for 80 st, then pick up natural (twist yarns!) and knit 170 st.
Repeat for 4 rows (2 ridges).
Knit 80 dark red, cut the yarn, join red (twist!), knit 170 st. (Note: This will cause a thin line of red to show through the natural on the right side of the scarf, as you’re changing the colors on the opposite side than you have been. See below close-up photo.)

Knit to end, cut natural, and continue with red only for 6 rows (3 ridges).
Change to dark red. Knit 2 rows (1 ridge.)
Bind off loosely with dark red. Weave in ends.
Finished measurements should be approximately 5” wide by 60” long unblocked.